Sunday, February 21, 2010
IPod touch wireless network password is case sensitive
Wednesday, September 2, 2009
Technology we use in development
Technology we use, are rapidly changing. Take a look at http://gantter.com, this site has been created by one person. One person? When I have a first look at site I had an impression that this work was done by a big company aka Google or similar size company. That is a really an estimate for amount of work. Could the technology give a developer ability to achieve more and spend less time for development? Probably that is the case. As an outcome of this shell be next – we must constantly follow new trends and techniques to be more productive. Our time is precious thing and we should not spend it unwisely.
Saturday, July 5, 2008
Install Subversion server 1.5 on Windows 2003

I have look over Internet for how to install Subversion server and found that in general this information is related to the Subversion server prior to version 1.5 that have been just recently released by CollabNet.
Now installation could done in just a few steps:
1. Run CollabNetSubversion-server-1.5.0-22-win32.exe
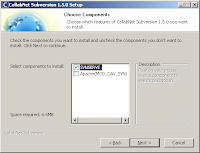
3. I have running IIS on port 80 so I have selected svnserve checkbox only and uncheck apache server checkbox
3. Use default settings on following steps
4. After install is completed start subversion service from Administrative Tools-> services
5. Run next command from command prompt, to create repository (similar to VSS database). It is a good practice to have repository per project:
6. Create users and passwords by modifying svnserve.conf and passwd files in C:\svn_repository\yourprojectname\conf subfolder
There are should no spaces in front of user name, otherwise you will recieve an option error.
7. Open TCP port 3690 in a firewall
To configure client computer:
8. Install TortoiseSVN-1.5.0.13316-win32-svn-1.5.0.msi on client computer
9. Connect your project folder to svn repository by right click and setting url to you repository. It will prompt you with user and password dialog box.
Friday, May 2, 2008
Schedule weekly job with cron and PHP

Several approaches might work depending on hosting configuration. The most straightforward approach with panel is to find cron jobs icon and select standard or advance version. Both of them have same information - standard form has combo boxes vs entering number into textbox in advance form. That should be done for specifying date and time when job should be executed. First version of command line used for setting a job is:
Possible error is "No input file specified."
Possible error is "No input file specified."
Possible error is "Could not open input file: /home/<myhomedir>/public_html/admin/job.php."
Last version of command line should work.
Thursday, April 17, 2008
Lock free communication channel
Writer’s thread will save data into Singly Linked Lists and assign unique ID to the package. Then reader’s thread will pick packages one by one, order them by ID, and store packages in a cache list.
The cache itself could be ignored when processing is interested only in latest package – real time data. Since InterlockedPopEntrySList could read packages in random order, is considered necessary after extracting all packages from a cache to find latest one.
Singly Linked Lists are straightforward to implement and use in 32-bit code.
Monday, April 7, 2008
SQL Express failed to install

During SQL Server Express installation on Microsoft Windows XP Home Edition next unexpected error occurs:
Product: Microsoft SQL Server Native Client -- Error 1706. An installation package for the product Microsoft SQL Server Native Client cannot be found. Try the installation again using a valid copy of the installation package 'sqlncli.msi'.
Workaround:
Extract 'sqlncli.msi' file from a package and install separately, then run SQLEXPR32 again.
Wednesday, April 2, 2008
Backing up and restoring MySQL db via the command line

In Windows click Start, select Run and type cmd, then hit OK button.
Backing up via the command line
Restoring via the command line
Drop the database (optional):
Create the database:
Import the backup data: